


Running a free yoga challenge is a great way to attract new students and grow engagement and connection! There’s something about the momentum of joining a challenge, doing things as a group, seeing results quickly, and the comradery that makes challenges so successful.
But where do you start, how do you plan your challenge and how do you actually execute it, without going crazy with tech overwhelm? In this ultimate step-by-step guide to plan and set up a yoga challenge I’ll share an exact plan that you can follow.
Step #1: Define your yoga challenge goals
Even when you create a free offer, you should set yourself some goals:
What do you want to achieve with your free yoga challenge? Do you want to grow your email list? Do you want to pitch a paid offer at the end? Do you want to test a new idea and see if it resonates with your audience? How many participants do you hope to get?
You need to be clear on WHY you want to do this challenge, and what you want to achieve, before you start getting into all the details.
Step #2: Come up with a topic for your yoga challenge
To come up with the topic for your free challenge, a great start is to ask yourself: “What’s something that my ideal client is struggling with that I can provide insight, support, and action on in a fixed time?”
Get clear on the results you want to get your participants. If someone commits to your challenge what can they expect as the outcome, and then break down the daily tasks necessary to ensure your participants will hit that.
At the same time, make sure not to overwhelm your audience. Adding too much content into a challenge is a very common mistake. When you expect your participants to do a 20-minute guided meditation each day, a 1-hour yoga class, and cook 3 meals from scratch, you set them up for failure. Plan it so your participants spend 20 to 30 minutes a day on your challenge, not longer.
Step #3: Plan how long your challenge will be
One of the best aspects of challenges is the ability to get people quick results through committing to something for a certain time aspect.
A lot of people make the mistake of thinking longer is better but think about it: if you host a 30-day challenge, every single day you will lose participants because there is a natural attrition rate when it comes to sticking to something.
But when your challenge is only 3 days (or less), you will be struggling to get your participants the results you are promising.
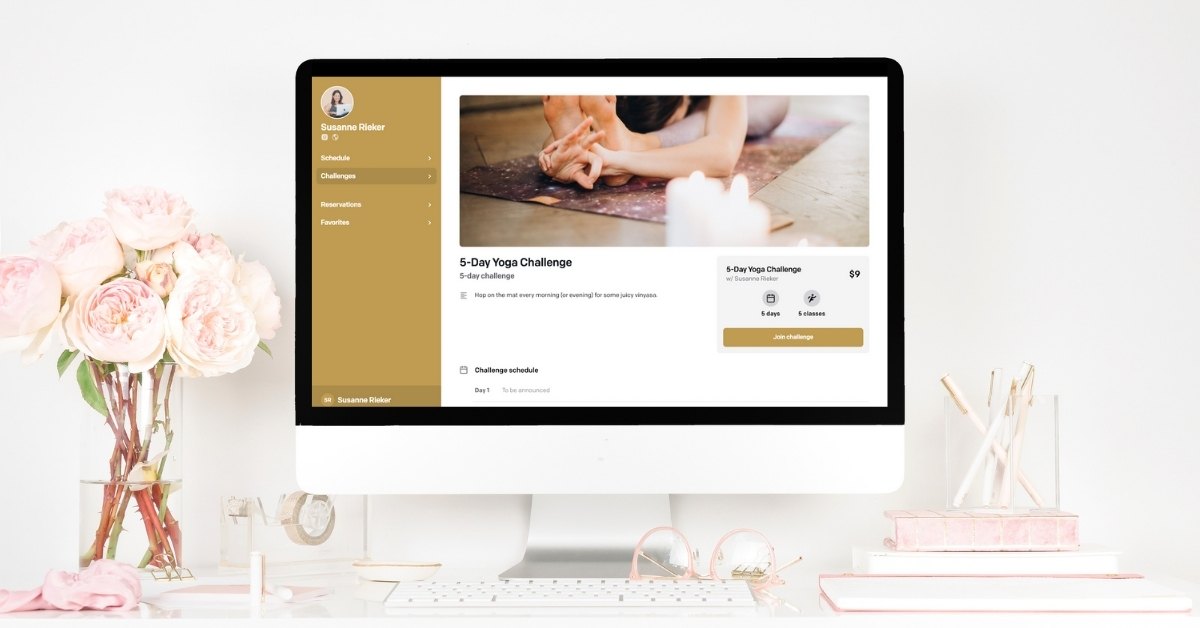
A 5-day challenge seems to be the sweet spot and it’s what I recommend to start with.
Step #4: Decide if you want to run your challenge live or with pre-recorded content
Creating an on-demand yoga challenge with pre-recorded content can be a great way to grow your subscribers. Here students can join and start the challenge anytime and watch your pre-recorded videos. If you choose this option, your challenge cannot include live classes. You can offer your challenge for free, but you could also charge for it.
A live challenge on the other hand has a limited registration period and everybody starts at the same time. This is more work for you, but it’s also a more exciting experience for your students. When you want to sell a paid offer at the end of your free challenge, I recommend doing a live challenge.
Step #5: Promote your challenge
I recommend starting with the promotion of your challenge one week before it starts. If you start too early, you will lose engagement and excitement. And if you are too late, you won’t have enough time to fill it up.
Promote your challenge by inviting your email list (I normally send out 3 emails), to your social media followers (at least 3-4 posts).
For example, you could start promoting your challenge 7 days before with one email and social media posts, the next email 4 days later, and a “last chance to join” email 1 day before the challenge start. On social media it really pays to show up as much as possible! Go live in your stories every other day, create some images with what’s included in the challenge in Canva and post them, and of course, add the link to the registration page to your Instagram bio.
Don’t forget your website! Add an info bar on top it to invite people to your challenge, optionally also a popup and mention the upcoming challenge in your latest blog posts.
Create images with Canva.com and write your captions in advance.
Step #6: Deliver your challenge
You can deliver your challenge live through Zoom, simply set up meetings and share the link in emails to your participants. When you are delivering your challenge live, make sure that you are prepared and know what you are going to teach.
Prepare emails to send out on every day to your participants and talking points for your lives.
Step #7: Follow up with your challenge participants
After you delivered your challenge, you can use the momentum to invite your participants to take the next step. You can offer a discount for your class passes so they can continue to practice with you or sell them an online course or group coaching program.
In any case, I recommend that you also send out a questionnaire after your challenge, asking your participants for feedback so you can learn from that and use it to improve your next challenge.
When you did a live challenge you can also turn it into an evergreen challenge that’s always available, or even into a paid product.
Have you set up a yoga challenge before? How did it go? Send me a DM on Instagram, I’d love to hear from you!
Conclusion
Here you go, that was A LOT of information! I don’t have the one platform that I think is the best for everybody, but I hope this overview gave you a bit of clarity.
To choose the yoga software that’s right for you I recommend that you start by making a list of all your must-have and nice-to-have features and then narrow it down to 2-3 platforms that you want to look at in more detail.
Sign up for a trial, have a look around and then make a decision and move on. It’s very easy to drag this process of choosing the right platform out indefinitely, but this will get you nowhere. In the end, it’s the quality of your content and teaching that will attract your students, not how the page looks where they sign up for a class.


")